Wednesday, December 28, 2011

Playing Inside Artist World...

hi
recently i put my time mainly in modeling/texturing etc... so in the post i will talk about the tools and the pipeline i'm using and then i'll show some works i'm working on.
the tools i'm using is:
1. autodesk 3dsmax 2012, 3d modeling software, for me its the best software... i always liked this program, very easy to understand and control, tons of tutorials more stable version.
2. autodesk mudbox 2012, this is a new program i had to learn from scratch, basically its a 3d sculpting and painting app, allows you to create high detail models and paint directly on them.
3. adobe photoshop, nothing to say about it, great image editing software.
so, the pipeline i'm using now is:
1. collect reference pictures, anything i want in my scene i search for real world references from different viewing angles.
2. start modeling low poly model using the reference images i collected, yes yes, i know i should start modeling high poly model and then create the low poly one, but i found this technique is a waste of time (for most of the models), and i can add detail later in mudbox/photoshop and believe me you wont even know...
3. create uv mapping, well, this is really important, what we really want is to create a uv set the maximize texture space in a way that important parts of the model get bigger area in the texture and at the same time try to make all our uv islands/chinks uniform as much as possible, in simple words, if you put a checker board texture on the model, you should see uniform checkers.
4. texturing, for this i'm using both photoshop and mudbox:
mudbox used when i don't need pixel perfect alignment and its great as i can see the results immediately, photoshop used when i need to fix things and add extra detail that needs pixel perfect matching...

one of the best things in 3dsmax/mudbox/photoshop is that they communicate, in a single click i can send model to mudbox, paint on it, another click to pass the textures to photoshop, fix few things and return to mudbox, the textures in modbox update automatically, and then in another click i update max scene to contain all the changes... really cool stuff, and time saver!

another thing that is really cool is that autodesk software can be downloaded for free! yes free!
how, well, they have an education program that allow students to enjoy their software, so what you really need to do is to register, fill your education info etc.. and you can download everything for free! really nice...
on autodesk site, click solutions-education-students-join...

the pipeline described used to create diffuse texture, to create other textures: normal/bump, specular etc... you can also use mudbox and photoshop also, though you can use other app's like: crazybump, shadermap pro, ndo2 etc... great programs.
maybe i will post on this next time.

now for some works i did recently (simple scene lighting, mudbox capture, without normal/bump/specular maps)

Fuse Box

Trailer Tire

Wood Pallet

Barrel

Power Box

cya until next time...

Monday, November 28, 2011

FBX Exporter

Hi
after the last post, i had to create a new plan and the first phase was to support different app's to create assets from.

up until now, i use my own maya exporter, which converts models/animations to my own format the engine can read.
this exporter was created entirely for the artist as he worked with maya.

for the record, i don't know to work with maya, but i know to work with 3dsmax, at the time, i didn't want to handle models/animation and prefer to focus on dev but now i will need to do both.

anyway, i decided that an FBX exporter will be good since i know to model/animate with max so i could create few things here and there and in the future i will not bound to a single software, and this is great as finding artist will be much easier if you are not bound to single app.

for these who don't know FBX format: FBX is an autodesk format created so you could share works with different autodesk app's like maya, 3dsmax, softimage, motionbuilder, mudbox etc...
FBX it comes will full SDK & samples and have fairly readable doc that explain how to use and build FBX app. (can be downloaded from autodesk site)

because i already had maya exporter which had all the conversion code to the engine, i just needed to import the fbx and convert everything just like i did with the old exporter, and within few hours i had support for models (no animation).

to support animation i had to dig a little bit as at first i tried to convert the matrices imported from the FBX to engine format at import time (left handed Z up) and that didn't went very well, as the hierarchy of the skeleton needed to work with the stored format, even when i succeeded the animation was screw up.
so what i did i imported the data as is (not changing/converting anything) and only in the exporting phase (just before writing to a file) i convert to my own engine format.
just like i did in the old maya exporter...
i burn a lot of hours just to realize that what i did in the old maya exporter was correct, if i just went and look at the old code i could save a lot of time and thinking...

after i finishing this i notice few animation didn't running correctly, some vertices isn't moving like they supposed to (relative the the skeleton), and after digging a little more i saw that some code i took from the old exporter wasn't fit right for the new one, and the vertices indices wasn't correct.
'vertices indices' means i have for each vertex X indices or more, for vertex position,normal,uv etc.. so these was screw up (the order wasn't correct) and the nasty thing is that for few test models with animation there was no bug at all and for some there was.

NOTE: the skeleton always act and looks fine but vertices wasn't, so it was hard to track down the bug.
the way i eventually track it is that i created a very simple model with animation and compare each of the vertices weights with the vertices weights exported (using weight table in 3dsmax), when i did that i notice that the weights values was fine but the order wasn't, so few vertices that influence by bone1 was influence by bone2 etc...

anyway, one thing to remember from this is that when you take code from some old code of yours make sure to check it fits, and don't assume its good.
it can be good/clean code but it doesn't means it fits like a glove...

so now that the pipeline works you will see some works on the next posts...
cya

Wednesday, October 19, 2011

The Smell of the Money Can Make You Blind...

Hi all
this time i'v some "bad" news.
last post i wrote about a project i'm about to expose, unfortunately this isn't going to happened.
i turns out that when "my friend" saw we have some real thing in our hands he smell the money, and that make him do what he did this week.
i wont get into details (numbers and stuff), but i feel i need to share what went wrong so if you will be in my position you know what to do.

i got to know this guy from a good friend of mine, so i trust my friend that this guy is ok.
from day one our working model based on free time only!
i gave him X percent for starting, and he began to work on some models, after working for a while, i rise it 1.5X and eventually he got 2X percent, even that the work he did stays the same, average of one model per week! (for the simple ones!, complex ones could get to one month)

2 weeks before exposing he told me that he wants more and told me to think very careful about what i'm going to say, so i though and even that there was no good reason to rise it up, i want him to be happy, so i give him another 25% of the 2X he got and told him i want him to sign on a contract i will arrange about everything we agreed on.

this week he told me that he doesn't want to continue, talking a little bit with him i realize that he wants 25%+, and he told me that i can't use his models in anyway... for the record, i can use them for non profit use, but i decided that i don't want to, i don't want him to have anything with my projects not now and not ever...

after checking out what he actually did in almost 2 years i saw its less than 50 models! including the simplest one (cans, bottles, barrels etc), so giving him 25% is giving him 0.5% per model!

so the bottom line of all this little story is:
don't trust anyone when doing this kind of thing, make a construct from day one, i did one and gave him but i didn't insist him to sign it, bad mistake.
i will be happy to hear what do you think, did i do the right thing? did i handled it correctly?

i always knew that money can blind wise peoples, but now i know that even the smell...

i will continue to update this blog, hopefully more recent...
cya

Thursday, October 6, 2011

Stay Tuned for the BLAST!

hi
recently i'm not updating this blog often, the reason is that me and my friend working very hard on a big project and i can't find time to post, every free minute i have i put in the project...
if you are curious, here are some Q/A:

* so... whats the big project you are working on?
well, basically it's a game.

* what kind of game?
that's will be published soon.

* what is so special about this game?
feeling! we work hard to make it feel real, in terms of look and feel...

* is it going to be a full game?
no, for now we will publish one level, to show what we can do.

* what engine are you using?
internal, for now i named it: OGE (oren game engine)

* why didn't you use cry-engine,unreal, unity,ogre, or any other free engines out there?
one word: freedom!

* can you tell about the engine a little?
yes, but this can be a very long answer, so here are few cool things we have:
  • Editor - the engine is just loading and running levels, all logic and gameplay scripted or set by the editor (nothing is hard coded)
  • Graphics - real-time GI, HDR, filmic tonemapping and filmic DOF , sun effects, flares unlimited lights and shadows! (every light cast shadow) and more...
  • UI - script based dynamic UI system supporting any resolution.
* where can i see screenshots, videos?
soon i will post screenshots of the project, and talked about few nice things i'v added into.

* do you need people to join in?
yep, basically we need:
art guys - concept, models, textures, animations etc...
sound/music guys to do sound effects and music.
so if you know someone, feel free to contact me.

i'v you have questions you want to ask, feel free...
cya

Monday, August 15, 2011

Sun Lens Flare


hi
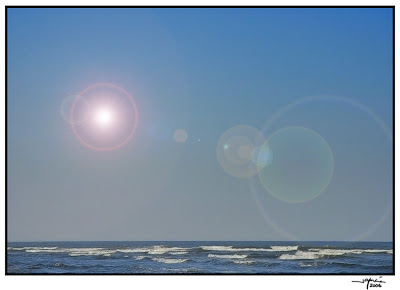
this time i added sun lens flare effect, if you don't know what i'm talking about, just read about it here
http://en.wikipedia.org/wiki/Lens_flare

or if you are lazy :) here is a picture shown this effect:

anyway, to create this effect, what you really need is few things:
1. couple of flare images
2. light position in 2d (screen space)

1. this is simple, just google on it, and you'll get some nice textures... (you can also use photoshop)
2. take you sun light position and project it into screen space, check z to make sure the light isn't behind the camera.
after you have this 2d pos, you need to create 2d direction vector pointed to the center of the screen, and place the flares from 1 in a different color/sizes along this vector.
that's it.
one thing to note is that flares do not disappear immediately when occluded, they basically stay visible and fade away very nice and smoothly (also when they become visible), thats because these flares created from a very bright light sources.
to achieve this kind of effect, what we really need is a way to count how much the light is occluded.
from this info we can compute a scale factor between [0..1] and scale the lens color so they fade in and out smoothy.
few options to use:

1. the simplest and naive way is to trace few rays from the light to camera eye and see how many of them passed and then compute scale factor from 0..1
pros: simple to implement.
cons: not accurate, can hurt performance.

2. texture masking, you render the scene from light point of view to small render target, lets say 16x16 (cleared to white), for every pixel passed you write black, at the end this texture will tell you how much the sun is occluded (the black pixels), to get the result from it, you can lock it out and count for the black/white pixels - not good idea, a better way is to render this texture into 1x1 render target (float point rt, and we will have to use 16x16 vertices for each pixel), we need to enable alpha blending to count the pixels. note that 1 in the 16x16 rt, could be counter for 256 times if all the texture is white (sun isn't occluded), but we need a value between 0..1 to scale the lens color with, so what we output from the ps, is the sampled pixel from the 16x16 rt scaled by 1.0/256.0 (16x16 = 256)
pros: better accuracy.
cons: not easy to implement, need hw float point rt, can hurt performace for big scenes.

3. use hardware occlusion query, just rendered some simple query mesh (quad,box,sphere) and count how many pixels passed, from this you can compute scale factor between 0..1
note that its a little tricky to use, you need a way to know the maximum pixels for the query mesh so you could compute the [0..1] scale factor, second, they can hurt your performance if isn't used right.
pros: very accurate, performance is very good if done right.
cons: need hw occlusion query support, can be tricky to do right.

here is a scren shot to show you the effect in action:

no lens effect

with lens effect

in my implementation i use option 3...
that's it for now, cya until next time ;)

Sunday, June 12, 2011

Sun Shafts / God Rays

hi

this time i talk about nice effect called: sun shafts/god rays/sun rays...
to save words explaining what it is, i found a nice picture that shows how this effects looks like in reality:

notice how the sun "enters" between the trees and block by others, this create the light shafts you see in the picture.
so how do we going to do this effect in real-time you ask?
well, very simple, good old demo scene effect called radial blur as post process effect will do the work (well, with a little help of some Gaussian blur)
so the main steps is:
1. compute light position in screen space (this is our sun light pos)
2. compute radial blur on our image, this is done by blurring the image using normalized pixel to light direction.
something like this:

blur_dir = (sun_pos_2d - pixel_pos) / NUM_SAMPLES
sum = 0
for i = 0 to NUM_SAMPLES do
{
sum += sample(image, uv)
uv += blur_dir
}
return sum / NUM_SAMPLES

this is just an example of the radial blur idea, keep in mind that in order to make the effect looks good you need to weight the samples to give you the best look that you are looking for.
3. combine both sun shafts result we got in 2, with our original image.
thats it.
here is some pictures to show the effect in action:

no sun shafts

with sun shafts

if you follow exactly by the steps i wrote, you probably need a lot of samples to get nice results, so here is few tips to make the effect fast and smooth:
1. try to down sample your image and apply the sun shafts effect on it
2. blur the sun shafts result with your favorite blur (should be fast enough)
3. because it a post effect, the effect will apply the sun shafts on all the image resulting shafts from none sun light pixels, to overcome this, you should mask out all pixels that shouldn't be effected by the sun shafts effect, techniques to consider:
* stencil buffer
* depth buffer
whatever fits you engine...
that's it for now, if you have any question, feel free to ask...
cya until next time

Tuesday, May 3, 2011

Bitwise Operators on Low End GPU's

hi
recently i was needed to perform bitwise operators on SM 3, but as you know, SM 3- doesn't support it (only DX10 SM 4.0 and up).
if you try to write this line: (hlsl SM 3 for example):
some_var & 2
you will get error message saying: Bitwise operations not supported on legacy targets.
the technique i present here can be used for few more things (lighting, shading etc), but here i will show how to do bitwise ops with it.
i support: &, |, ^ (AND,OR,XOR) - more complicated operators could be used but these are the base.
the trick is to use a texture to store the results of these operators, and then to sample this texture and get the result.
a code to compute this texture will look like this: (assuming 8 bit range for AND op)
for i=0 to 255
for j=0 to 255
texture[i][j] = i & j
to maximize storage, encode different operators on different channels.
here is a sample texture that encode AND,OR,XOR in different channels:

bitwise operators texture: AND,OR,XOR

the way you use this texture in your shader looks something like this: (hlsl style)
float AND(in float A, in float B)
{
tex2Dlod(BitwiseOpMap, float4(A, B,0,0)).r;
}

NOTE: make sure you use POINT sampling, you don't want to filter the results in the texture, you also don't need mipmaps...

thats it, i hope you find this post useful...
cya until next time ;)

Sunday, May 1, 2011

Post Anti-Aliasing #2

hi
few months ago i'v read an article on intel research group called: Morphological Antialiasing.
this technique designed for cpu but with few tricks and hacks we can use it on gpu as well.
the algorithm consist of 3 main steps:
1. find discontinuities between pixels
2. identify predefined patterns
3. blend pixels in the neighborhood of the patterns in 2
1. simple edge detection on the image, using depth or color differences should do the work, keep in mind that you should encode edge type in you color channels so you could use it in 2, lets say red is horizontal edges, and g is vertical edges.
2. this is tricky, you basically need to identify few shapes: Z, U, L
see image below (grabbed from original intel article):


Reshetov A. 2009. Morphological Antialiasing. In Proceedings of High Performace Graphics

so based on the article, you only need to identify L shapes, as Z, U can be split into L shapes.
for more deep information please refer to the original article that can be found here:
http://visual-computing.intel-research.net/publications/publications.htm#Y2009

to identify L shapes there are few tricks, a simple one is to just follow the edges you mark in 1 and see if you get a match (few loops for each side: left/right/top/bottom and of course branching), if so you compute blend weights for these and continue to the next edges.
at the end, you end up with blend weights texture so you could blend the pixel to get the final image, you can use a the trick described in gpu pro 2, they encode the final weights in textures and sample it.
btw: if you have ATI HD 6850+ you have built in support for that, so no need to worry, for consoles you may want to worry a little ;)

this technique isn't simple to implement as a first shot, i tried few algorithms and techniques before i got this thing working.
after seeing the demo from gpu pro 2, i'v got to say i was impressed by the speed of their implementation so i put some tricks into mine as well to get the missing cycles :)

optimization tip: when doing edge detection pass, use the stencil buffer to mark these pixels, then in the next step, use the stencil apply your "massive" shapes/blend weights shader only on edges pixels, this way you won't waste power on irrelevant pixels

here is a few screenshots of the main steps and result:

Edges Detection with encoded edge type using image colors

Blend Weights

Without MLAA

With MLAA

Without MLAA

With MLAA

as you can see, this technique have very good result.
extra: few other techniques you should check:
* GPAA - show it at humus
* FXAA - nvidia sdk 11 (looks pretty good)

cya until next time...

Sunday, March 20, 2011

Adding Vegetation

hi
one of the thing i always wanted to add is vegetation, tree, weeds, grass etc...
in a nutshell, to support all kind of vegetation you need to have few things:
1. some app to generate the content, plant model, textures etc.
2. engine supporting geometry instancing.
3. extra (depends of scene size), engine supporting model level of detail (LOD)
4. extra (depends of scene size), engine supporting good outdoor culling.
1. this is very critical, having great app for generating plants is a must, if the model and textures isn't quality enough, the best code won't do much... i checked some apps, and i want to tell you that if you have some $, speedtree is the way to go, checked it, love it...
2. if you are going to render plants, you won't render one tree with 1x1 meter of grass, you probably want to spread it all over a 1x1 km terrain, so you are going to render hundreds of the same plant with different properties or such, so you don't want to kill your gpu with 20000 draw calls... unless real time performance isn't an issue for you.
for me performance is critical so i'v implemented instancing support for each plant type.
3. if your scene is large enough you need to consider LOD support, there is not need to render full plant geometry from certain distance, you probably won't notice if its real geometry or simple billboard, but your gpu will, so consider replacing you full model with low model or even quad when distance to eye pos is large enough.
i added auto lod support in the engine and use it also for plants (maybe i will post on it next time)
4. if your scene is large enough and you have massive amount of plants, so you already know that its a good idea to cull your data.

anther thing, because we are using instancing on the same model again and again, its a better idea to break symmetry when rendering the plants.
you can place them with different rotation and apply random motion for each plant (in shader).
here is a screenshot of a test scene:

vegetation, sun shafts and dynamic atmosphere

cya until next time...

Sunday, January 30, 2011

Lens Effect / Bokeh - Getting Into Details

hi
last time i talked about lens effect/bokeh, this time i talk about how to do it using FFT with information of how to implement it on the GPU.
i will not get into the theory of FFT, if you want to, check out this:
http://en.wikipedia.org/wiki/Fast_Fourier_transform

what i will explain here is how to do image processing using FFT and how to achieve a lens effects/bokeh filter.
if we have an image and we apply FFT on it we get this image in something called frequency domain.
after applying FFT every pixel in the image have its own frequency in the frequency domain that compose of a real and imaginary parts (a complex number)
after getting the image in the frequency domain, all we have to do is to decide which frequencies we want to "filter" out and then, apply the inverse FFT to get back to our image domain again, without the "filtered pixels"
that's the main idea.

nice thing with FFT is that its separable, what this means is that to apply FFT in 2D, we can simply apply 2 1D FFT, the first one goes on the rows (horizontal) and the second one goes on the columns (vertical) of the result.
another thing to know is that transforming N points can be done with two N/2 transforms, that is a dived and conquer approach, which helps to reuse computations.
so knowing that, we will use a divide and conquer algorithm called butterflies:
more info can be found here:
http://en.wikipedia.org/wiki/Butterfly_diagram
http://www.cmlab.csie.ntu.edu.tw/cml/dsp/training/coding/transform/fft.html

you can see really nice diagrams which helps to understand how it is works and how we can create and encode indices and weights for doing FFT on the GPU using textures and ping/pong method.

so if for example we have N=8 points to transform, we have log2(8) =3 steps of butterflies to perform, beginning with computation on four 2 points DFT, then two 4 points DFT and finally one 8 points DFT.

so, assuming you understand what the butterfly does, the steps to do it on the GPU is a matter of doing those steps:
1. create 2 textures (render targets) used for the ping/pong operations, those needed to be with high precision float point because the pixel on the frequency domain is a complex number with greater range than the pixel in the image spatial domain.
2. encode indices & weights into texture (also high precision)
3. do log2(Width) horizontal butterflies steps (using RT's from 1 and bf from 2)
4. do log2(Height) vertical butterflies steps (using RT's from 1 and bf from 2) on the result from 3
lets call those steps GPFFT
note: the log2 in steps 3,4 - this needs your image to with power of two size.
so how all of this nasty things helps us to do image processing on an image? and where is the bokeh stuff?
so here is the beauty:
suppose we have 2 images, one of them is our kernal, lets call it K, and the other is our source image that we wish to apply the effect on, lets call it I
apply GPFFT on K,I (transform them into frequency domain), multiply them together (complex multiply, remember we are using complex number in this domain), and then apply inverse GPFFT (to inverse transform the result) on the result to get a new I' convolved with K.
and that's it, all it matter is how your K looks like (the size and shape: triangle, square, octagon etc) and whats I.
as for bokeh/lens effect, basically it is working on bright pixels so simply filter the brighter pixels from your image with some threshold into other image (this is your I) and do the process on it.
this method works on low systems, DX9 with MRT support.
we can optimize the algorithm a lot using DX11 compute shader and get rid of the log(N) passes of steps 3,4 and perform only on pass each.
hope this post didn't make you headache' i'm starting to get one ;P
that's it for now
cya next time...

Tuesday, January 4, 2011

Lens Effect / Bokeh

hi
this time i'm attacking a problem related to lens blur effect or bokeh.
as you know (or don't) real time app such as games mimic lens effects with blur filters that applied on some image (scaled or not, depending or the app)
until now, blur could be done with few methods/filters such as gaussian, poisson disk, bilateral and etc depending on the problem you want to solve.
for example:
1. Gaussian could be used for blurring image that need a smooth look, like lighting and such...
2. Poisson disk blur could be used to smooth shadow mapping as it faster than 1 and basically produces nice result.
3. Bilateral blur could be for smoothing SSAO, because it can take into account few vars (like normal, depth) when doing the blur and reduce bleeding.
ok, those methods used until now and rely on samples count.
more samples means nicer result but takes a lot of power and most of the time it doesn't really worth it...
what we really need is a filter that doesn't rely on the kernal/filter size and mimic real camera lens effects without killing our app and can achieve this:

image taken from wiki under 'bokeh'
Coarse bokeh on a photo shot with an 85mm lens and 70mm aperture, which corresponds to f/1.2

the circle shapes is what we need to achieve! (or any other shape we want).
how we get this in reality: when we use smaller f in our camera, out of focus areas/points blurred into polygonal shape formed by the aperture blades.
somebody did this in real time or what? yes, Futuremark group in their new 3dmark 2011 benchmark (the underwater demo... amazing stuff...) and i think me 8p
lets see screenshots:

original image

increase filter size

and here is the hexagon shape...
note that any shape could be done with no cost!

and a video...


real time video of lens effect / bokeh

with the new gpu's features and dx11 we can do it in real time, right?
well... yes, but we don't really need dx11 or 10... ;p
what we really need the heavy duty guns! Fast Fourier Transform or FFT in short...
cya until next time...